
|
|
|
|
1. Assembly Time and Weather Conditions |
Top of Page |
|
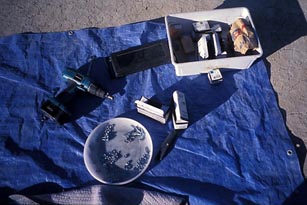
| Assembly Time: With three people and 2 cordless drills on hand, it took us between three and four hours to put up one dome. Weather Conditions: Don't assemble the dome if wind and/or rain are forecast. |
|
2. Nuts, Bolts and Washers |
Top of Page |
|
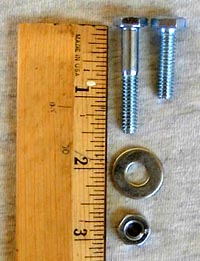
(1) The amount and sizes of nuts, bolts and washers for one dome are as follow:
|
 |
|
3. Tools |
Top of Page |
|
|
 |
|
4. Preparing Flooring and Work Area |
Top of Page |
|
|
(1) The dome's carpet and plastic ground cloth serve as one work surface, a tarp serves as a second one. (2) Decide on a place for the finished dome. Unroll the plastic ground cloth there and then carefully unroll the carpet on top of it. If the carpet was made in several sections be careful not to pull it apart when positioning it. The exact positioning of both the carpet and the dome takes place later on. (3) Unfold and secure the tarp to create the second work surface. |
 |
|
5. Making the Six ABB Pentagons |
Top of Page |
|
|
(1) Stack the ABB triangles next to the work area. (2) Take two triangles. Figure out which edges are the 'B's. Align the 'B' tabs against each other (see diagram opposite), then bolt them together through the bolt holes using a 1" bolt, a nut and a washer on either side of the tabs (see diagram below). To tighten, hold the nut in place with a wrench and, using the lowest setting on the cordless drill, fasten the nut and the bolt securely together using the magnetic nut setter bit. Don't forget the washers! Stop fastening the bolt into the nut when the washers start making an indentation in the cardboard. Do not break the surface of the cardboard as this will weaken the entire structure.  (3) If some of the bolt holes don't align properly, select one of the holes and punch through the opposing tab with an awl to create a new hole. Bolt the tabs together through the new hole. |
 |
|
|
(4) Add another ABB triangle to the two just connected. Once again connect a 'B' tab to a 'B' tab.
At this point of the operation the easiest way to make the bolt connections is to stand the triangles up in a three sided pyramid shape with all the 'A' sides sitting on the work surface (see picture opposite). | 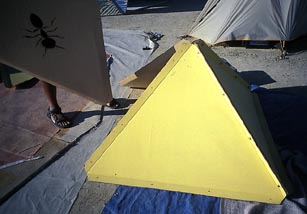 |
|
|
(5) Add the fourth triangle in the same way as the third; except that now the pyramid is four-sided. |
 |
|
(6) To add the fifth and final triangle, lay the four connected triangles flat on the ground with the interior facing upward. Connect a 'B' tab to a 'B' tab. It may be necessary to kneel on one of the triangles in order to attach the nut, bolt and washers through the holes closest to the center of the pentagon. If this is the case lay a board or something like it on the cardboard to help spread out the weight and not create dents. (7) Before connecting the final two tabs the pentagon must be made into its final shape; the exterior must be made convex and the interior concave. When doing this make sure all parts of the tabs are on the interior, especially the ends that make up the hub of the pentagon. (8) First bolt the tabs together through the holes closest to the 'A' edge, then through the holes closest to the hub. Finally, bolt the middle holes. If part of the operation involves kneeling on one of the triangles, use a board to spread the weight as in step six. (9) Repeat these steps till you complete all 6 pentagons. |
 |
|
6. Duct Taping the Six ABB Pentagons |
Top of Page |
|
|
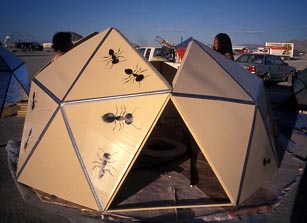
(1) To capitalize on work space, stack the finished pentagons one on top of the other. (2) When duct taping the pentagons everything must be as clean as possible. Wash the dust off your hands. Lay the duct tape on a clean surface, such as a plate, and have a moist rag and a bucket of water on hand for cleaning the pentagons. (3) Five of the pentagons have one 'A' side that will rest on the ground. The chosen 'A' tab of each pentagon must be cleaned and then duct taped along that edge to prevent rain water from entering. The sixth pentagon will become the roof and should not be edged with duct tape. |
 |
|
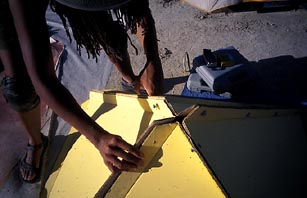
(4) Before applying tape to the exteriors of the pentagons first clean the areas along the 'B' tab joints with a moist rag. (5) Taking note of the bottom edge of the pentagon, start applying lengths of duct tape over the joints in the following order: first tape the two joints immediately above the bottom, at five o'clock and seven o'clock. Then tape the joints at ten o'clock and two o'clock. Finally apply a length of tape to the upper most joint (see picture opposite). Each of the lengths of duct tape should meet on the central hub. The last piece should overlay the four other pieces. Once again this is to prevent weather from getting in. (6) Using a dry rag, buff all the duct tape to ensure good adhesion. |
 |
|
7. Adding AAA Doorway Triangles |
Top of Page |
|
|
(1) Attach a AAA doorway triangle to the right side (in relation to the bottom of each pentagon and looking from the inside out). Do this to each of the five wall pentagons using 1 1/2" bolts. (see diagram opposite). The heads of the bolts should be on the inside of the wooden triangle and the nuts on the cardboard side of the 'A' tab of the abutting ABB triangle (see diagram below). If some of the holes don't line up poke a new one from the wood side through to the cardboard side and use that instead. Note: Make sure the velcro side of the AAA doorway triangles is facing outward. 
|
 |
|
(2) Once all the pentagons have a AAA doorway triangle attached, select two of the pentagon/AAA units and link them together as shown in the diagram opposite. (3) Select another pair of the pentagon/AAA units and link them together as shown in the diagram. You should now have three units: two pentagon/AAA-pentagon/AAA units and one pentagon/AAA unit. |
 |
|
|
(4) Clear everything from the dome carpet as this will now be the work area. (5) Place the container holding the nuts, bolts and washers in the center of the carpet along with all the tools required for screwing on the nuts. Add anything that could reasonably be used to help prop up the walls of the dome as it's being build, i.e. a broom or beach umbrella. (6) The next part of the operation requires two and preferably three or more people. (7) Move one of the pentagon/AAA-pentagon/AAA units over to the carpet and lay it down. (8) Move the second pentagon/AAA-pentagon/AAA unit over to the carpet and lay it down. (9) Stand up the first pentagon/AAA-pentagon/AAA unit and, while one person holds it in place, stand up the second pentagon/AAA-pentagon/AAA unit and move it into place with the AAA triangle of one unit abutting the pentagon of the other unit. (10) Bolt the AAA triangle to the pentagon. There is a good chance the structure will hold itself up at this point but it is better to have a person or persons supporting the dome from the inside as in the pictures opposite. |
 |
|
|
(11) Bring the final pentagon/AAA unit over to the carpet and bolt it into place. The bottom of the dome is, at this point, complete, but the structure is still very unstable. Make sure the bottom edges are flat on the ground. This will require some tweaking and patience. (12) Have at least two people continue to support the inside of the dome. |
 |
|
8. Adding AAA Vent Triangles |
Top of Page |
|
|
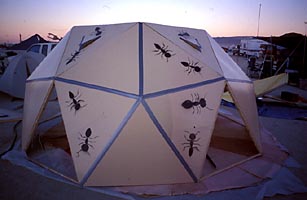
(1) When adding the 5 AAA with vents it is a good idea to have a fourth person on hand or a couple of suitable props. (2) Slot a AAA vent into place between the "v" created by the upper parts of two pentagons. Make sure the vent flap is facing downwards. Connect the AAA vent to the pentagons with 1 1/2" bolts. It doesn't matter in this case whether the bolt head is against the wood or the cardboard. Don't forget the washers! If some holes are mis-aligned poke a new hole with an awl starting from the wood side and use the new hole for the bolt. (3) Use the props and/or an extra pair of hands as necessary to keep the structure from sagging excessively. (4) Continue until all five AAA with vents are in place. Once the final vent is in place the dome will feel sturdier. Tip: during AAA vent connection we have often only connected each vent with two bolts per side to speed up the process. As soon as the final pentagon creates the roof the dome suddenly feels very sturdy. After attaching the roof go back and add the extra bolts to the vents and tighten the others as necessary. |
 |
|
9. Adding Top Pentagon |
Top of Page |
|
|
(1) Place the roof pentagon on top of the dome. (2) Make sure the tabs are on the inside all the way around before adding any bolts. (3) Connect each of the five roof tabs to the adjacent AAAs with only one nut and bolt per tab (don't forget the washers!). The other nuts and bolts will be added later. This is the quickest method to make the structure sturdy. (4) The dome is now strong enough for everyone to stop supporting it and help with adding the remaining nuts and bolts. (5) Once all the nuts and bolts seem to be connected double check everything for missing ones and for those which haven't been sufficiently tightened. |
|
10. Moving Dome to Final Position |
Top of Page |
|
|
(1) To move the dome to its final spot requires three people at minimum (2) Decide on which way the dome is going to be swiveled. Have each person take up a spot on the inside of the dome, spread their arms out as far a possible, take the weight of the dome via the tabs and then as a group rotate the dome into place. (3) Make sure the bottom edges don't fold in. Align the decagon shape of the dome with the carpet. |
|
11. Connecting Dome to Ground |
Top of Page |
|
|
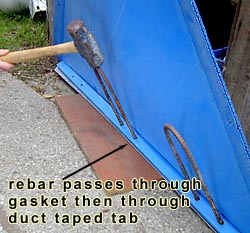
(1) Place a wooden gasket on top of the bottom tab of each pentagon (these are the tabs with duct tape on their edges). The gasket should be centered along the length of the tab so that either end is approximately 2" from the corner points of the ABB triangle. (2) Insert the rebar horseshoes through the holes in the gaskets. With a sledgehammer pound the rebar directly through the tab and into the ground. Be sure to angle the rebar slightly to allow enough room to swing the sledgehammer without hitting the walls of the dome. Tip: Wear gloves! |
 |
|
12. Final Taping on Dome |
Top of Page |
|
|
(1) The joints where the pentagons meet the AAA vent triangles need to be taped. (2) As when taping the pentagons, the joints first need to be cleaned with a moist rag, the duct tape should sit on a clean surface between applications and your hands should be clean. (3) Rub down each taped joint with a dry rag to aid in adhesion. (4) Do not tape the AAA doorway/pentagon joints |
 |
|
13. Cutting the Plastic Ground Cloth |
Top of Page |
|
|
(1) Use a utility knife to cut off the excess plastic visible on the outside of the dome.
Try to cut it so that the edge of the plastic is slighty indented in relation to the wall above it. |
|
14. Doorways, Rain and Wind |
Top of Page |
|
|
(1) The doorways can be attached and taken off at any time. To attach them simply slot them into place and apply pressure to the areas where the pieces of velcro are. When not in use, try to store them out of the wind. (2) In the event of rain close the vents as much as possible, attach the doors and then, if desired, stick a small piece of tape over the apex of the doorway to help divert the initial flow of water. |
|
15. Final Touches |
Top of Page |
|
|
(1) Use the interior touch-up paint to coat any edges that didn't get sufficient paint during the original process (generally the edges of the tabs). The duct tape around the inside of the vents should first be primed and then painted. Doing all this will make the inside of the dome visually stronger and more coherent.
(2) If any exterior paint was damaged during assembly, prime and repaint those areas as soon as possible. |