|
|
|
| Please note: There are two methods for painting the domes; spraying or manual. Sprayers may be rented but can be difficult to use and require a large amount of drop cloths. Manual painting requires less expertise but may take longer. |
|
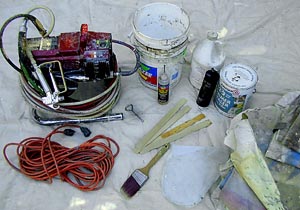
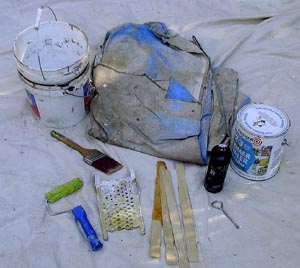
1. Painting Tools and Equipment |
Top
of Page |
|
Spraying
|
 |
|
By Hand
|
|
| 2. Painting Methods |
Top of Page |
|||
|
||||
• Types and Amount of PaintWhether spraying or rolling use the same type of paint. The outside needs to be waterproof.Primer I recommend first priming both the inside and the outside of the triangles. The primer should be water-based and quick-drying. I generally prefer not to give product names but in this case I'll make an exception and tell you that the primer of choice is Zinsser 123. It is highly tintable, water based and most important of all dries to touch in roughly 45 minutes and can be recoated in 1 hour. Tinting your primer adequately may allow you to use only one coat of paint. Use black universal tint to obtain the same tone value as your paint color. Paint The outside of the dome must be water-proof. For this reason, I recommend using a water-based enamel paint with the highest sheen you are willing to live with. Semi-gloss enamel will provide mininmal yet adequate protection. Alternatively it is also possible to cover the exterior with another type of material; in 2003 we covered one of the domes with mylar. The type of paint used inside the dome is unimportant. Once the priming has been done you can paint it however you wish with whatever type of paint you prefer. Amount of Paint It should take approximately one and a half gallons of primer to suitably prime both the inside and outside, one gallon to finish the inside and another to finish the outside. Tips
|
Top of Page or Painting Methods |
|||
• Spraying(1) Try to find a place out of the wind and with as little foliage overhead as possible.(2) Lay out the drop cloths over as wide an area as possible while making sure they overlap one another. (3) Cover up anything and everything in the surrounding area that you'd prefer not to get paint on. (4) Place the AAA and ABB cardboard triangles in rows across the drop cloths with the interior side facing upwards. Check the AAA triangles as you place them to make sure that any defects are on the interior. (5) Lay out the wooden triangles and the wooden gaskets. (6) Set up the sprayer with the tinted primer and test the spray on a scrap piece of cardboard. A "5-17" tip should be adequate for the job (5 refers to half the width of the spray, in this case five inches and 17 refers to the hundredth of an inch size of the spray tip aperture, in this case seventeen hundredths). (7) It is advisable to have a second person on hand when spraying. This person holds the excess spray hose, making sure it doesn't swipe any just-painted surfaces. (8) Once all the interior sides have been primed and have dried for the time specified on the can, flip them over and repeat the process on the exterior sides. (Don't forget to change the tonal color of the primer if applicable). (9) Wait an hour, flip all the pieces, paint the interior color. (10) Wait the amount of time specified by the instructions on the side of the can, flip all the pieces, paint the exterior color. Remember that the wooden gaskets only need to be painted with the interior paint and only on one side. Tips
|
Top of Page or Painting Methods | |||
• Painting by Hand(1) Try to find a place out of the wind and with as little foliage overhead as possible.(2) Lay out a drop cloth for working on. (3) Decide which sides of the AAA and ABB cardboard triangles will constitute the interior of the dome (those with more defects) and which will be the exterior. Stack them with the interior sides facing upward next to the drop cloth. (4) Make a set-up using tinted primer, a two and a half gallon bucket, a four inch screen, a mini-roller handle and mini-roller with a thick nap. Have a brush on hand to pick up drips. (5) Roll the interior side of each triangle, then place it somewhere to dry with the primed surface facing upwards. (6) Continue until all the interior sides have been primed, then prime the wooden AAA triangles and the tops and sides of the wooden gaskets. (8) Once all the interiors sides have been primed and have dried, flip them over and repeat the process on the exterior sides. (Don't forget to change the tonal color of the primer if applicable). (9) Wait an hour, flip all the pieces and paint the interior color. (10) Wait an the amount of time required by the instructions on the side of the can, flip all the pieces and paint the exterior color. Remember that the wooden gaskets only need be painted with the interior paint and only on one side. |
Top of Page or Painting Methods |
|||
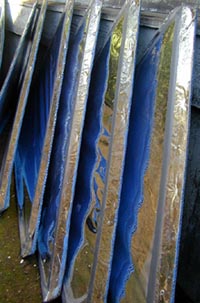
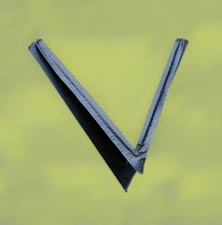
• Storing the Triangles While They Cure(1) Water-based paints can take anywhere from one to two weeks to cure. For this reason it is a not good idea to stack the triangles immediately after painting, as they may stick together.(2) Place the pieces sideways against a wall, so that only one edge is touching the wall and the body is pointing away from it at an angle. Place the next triangle at the same angle right by it and so on and so forth until all of the triangles are lined up (see picture opposite). (3) If you leave them outside, put a plastic drop cloth below them and then cover them with more plastic sheeting to keep the weather out. (4) After a week or two it should be okay to stack them, one atop the other. Stacks of ten or so are recommended to prevent sticking. Check them periodically to make sure they are not sticking and separate them if need be. |
Top of Page or Painting Methods
|
|||
• Touch-up Paint(1) It is extremely important to keep touch-up paint.(2) To save space, buy an empty quart can with a lid for each color you'll be using, plus an extra one for primer. (3) After decanting the excess paint into the quart cans make sure the lids are securely closed (you'd be surprised how often this doesn't happen). The best method is to put the lid in place, cover it with a cloth then hammer the lid into place. Double check the rim afterwards to be absolutely certain it is closed properly. |
Top of Page or Painting Methods |
|
|
Top of Page |
|
|
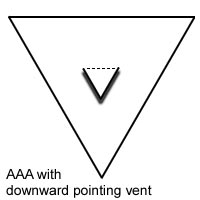
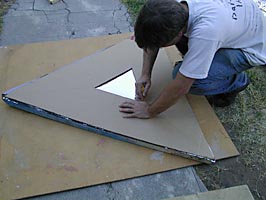
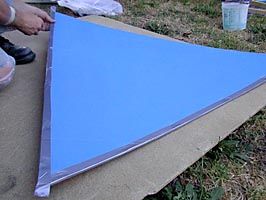
(1) Each��� upper AAA triangle ha���s a vent for air circulation. The vents are simply triangular flaps cut into the cardboard and then edged with duct tape to help keep out bad weather. In the diagram opposite notice that the triangle and the flap are pointing downward (the dotted line represents the fold of the flap). The flap points downwards in case of rain. Please note: the triangles in the following pictures were covered with mylar as opposed to paint. |
 |
|
| (2) Make a template for outlining the flaps with a spare AAA cardboard triangle. Find the center of the AAA triangle. Around it measure an equilateral triangle with 12 inch sides. Make sure the sides of the smaller triangle mirror the edges of the larger triangle, as in the diagram. Cut out the small triangle. (3) Place the template over the cardboard of a wooden sided upper AAA triangle and outline a small triangle on to it. |
 |
|
| (4) Using a straight edge and a sharp knife make two cuts. | 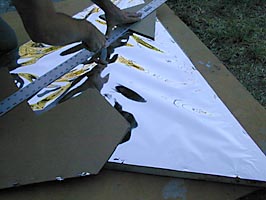 |
|
| (5) Place the straight edge along the length of the uncut side and slowly and deliberately pull up the inner triangle until a satisfactory flap has been created. | 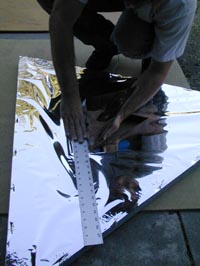 |
|
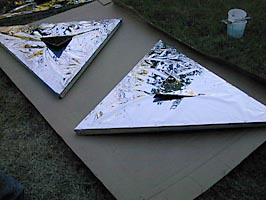
| (6) The flaps should look like the ones in the picture opposite. Although the flaps will seem to want to sag under their own weight once the dome has been assembled, they do in fact hold themselves adequately in place. |
 |
|
|
Top of Page |
|
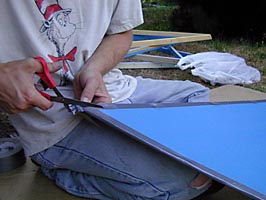
| (1) All the edges that create the vents must be duct taped (2) We have found that the easiest and most aesthetic results can be obtained by folding a pre-cut length of duct tape along the length of an edge then lightly cutting it to shape afterwards with razor blade or utility knife. |
 |
|
|
Top of Page |
|
| (1) All the edges of the AAA cardboard doorways need to be duct taped to keep the weather out. (2) Simply duct tape the edges and cut off the excess with a pair of scissors. (3) For the trully paranoid an extra taping should also be applied. In this case the second application of tape is taped closer toward the edge on both sides of the cardboard. The resulting excess along the entire length of each side is then stuck together creating a lip. This lip helps keep out wind and water. Like the first taping it is clipped at the corners. |
 |
|
 |
|
|
Top of Page |
|
| (1) Using velcro on the doorways allows them to be easily attached or removed. (2) Each dome requires 13 1/2 feet of velcro. This includes velcro for one extra doorway. (3)Try to find sticky back velcro that is either 3/4" or 1" wide with a release film that extends beyond the width of the velcro itself, for easy removal. When handling the velcro try not to touch the glue with your hands. (4) Cut the velcro into lengths 1 and 2 inches. Use the 1 inch lengths to cover the corners. (5) Attach the velcro at equal distances (see diagram apposite) to the insides of the AAA cardboard triangles and the lower AAA wooden frames. Make sure there is one piece in each corner. The velcro on the insides of the AAA cardboard triangles will attach to the duct tape edging by default. (6) Be consistent when attaching the velcro. If one wooden frame gets the hook side, all the wooden frames should get the hook side. |
 |