
|
|
|
|
1. Tools | Top of Page |
|
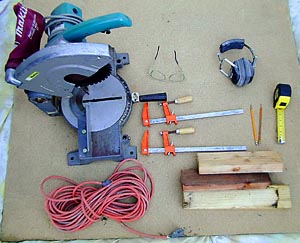
(1) Tools for Cutting Wood
|  |
|
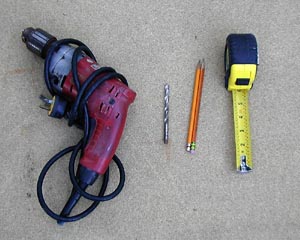
(2) Tools for Drilling Wood
|  |
|
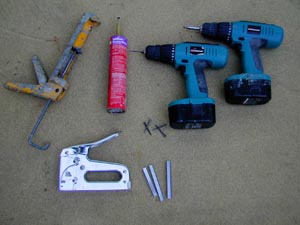
(3) Tools for Connecting AAA Pieces
|
|
|
2. Wood | Top of Page |
|
|
(1) Each triangle is made from three 1" x 2" x 4' pieces of cheap lumber. (2) Seventeen pieces of 1" x 2" x 8' are needed to make all ten wooden triangles for the dome plus one spare. (3) Because the wood is cheap it is generally bad quality. Check every piece of lumber for:
|
|
3. Dimensions | Top of Page |
|
|
Each of the ten AAA wooden triangles is made of three pieces of 1" x 2" wood cut
to (roughly) 48" in length.
The bolt hole distances are equal to those on the A side of the ABB triangles (see diagram on the ' Cardboard Triangles' page), however because the end of each piece of wood is cut at least twice it is common for each piece of wood to be slightly shorter than 48 inches. As a result please carefully read the section on drilling the holes, below, as doing it correctly will save a lot of hassle later on during assembly. |
|
4. Cutting | Top of Page |
|
|
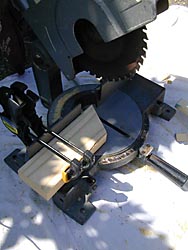
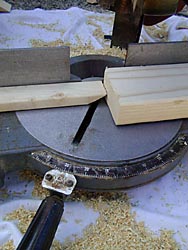
(1) Cut all the pieces of 1" x 2" x 8' into 4 foot pieces using the
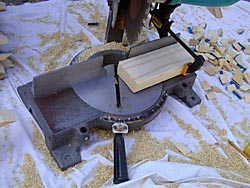
zero degree angle on the chopsaw. (2) Cut a piece of 2" x 4" at a 30 degree angle using the chopsaw. (the blade will be pointing back toward your left) (3) Return the angle of the chopsaw to its zero degrees point. (4) Clamp the cut piece of 2" x 4" to the body of the chop saw, as shown in the picture opposite. |
 |
|
|
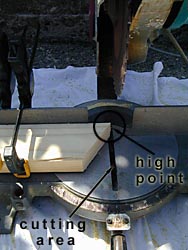
(5) Make sure that the high point of the wood block's angle is very slightly
to the left of very center of the chopsaw's cutting area. |
 |
|
|
(6) Following the 30 degree angle of the clamped block and at a distance of roughly
three and a half feet from the block, place a couple of pieces of 2" x 4".
These pieces work as supports for the 1" x 2" x 4's while making the first
two series cuts (see indication of placement in picture opposite). (7) Guide a piece of 1" x 2" into the cutting area. Make sure that it's tip is at the same point as the high point of the wood block in the cutting area, that the 2" side is flush against the cut edge of the 2" x 4" and the 1" side is pointing skyward, and finally that the other end of the 1" x 2" is resting on the wood blocks in step 6. (8) Hold the 1" x 2" firmly in place and make a cut. (9) Flip the piece of 1" x 2" and repeat steps 7 and 8. Your piece of 1" x 2" should now look like the one in the diagram below. 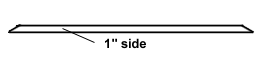 (10) Repeat steps 7 through 9 until all the wood is cut. |
 |
|
|
(11) Remove the 2" x 4" block from the chopsaw, swivel the base around
to 30 degrees and lock into place. (12) Clamp the 2" x 4" block on to the right side of the chopsaw with the 90 degree angle point almost centered in the cutting area. Try to make it so that the right side of the blade is just shy of rubbing the wood block. |
 |
|
|
(13) Guide one of the previously cut pieces into the cutting area. Make sure
its tip abuts the 90 degree angle of the block and that the cut on the 2"
side faces upwards, as shown in the picture opposite. (14) Hold the 1" x 2" firmly in place and make a cut. (15) Repeat steps 13 and 14 till all the pieces of 1" x 2" have a second cut on the one side. |
 |
|
|
(16) Finally, guide a piece of 1" x 2" into the cutting area to make the
final cut. Make sure its tip abuts the 90 degree angle of the block and that the
cut on the 2" side faces downwards, as shown in the picture opposite. (17) Hold the 1" x 2" firmly in place and make a cut. (18) Repeat steps 16 and 17 till all the pieces of 1" x 2" have a second cut on the other side. Your piece of 1" x 2" should now look like the one in the diagrams below. 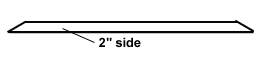
|
 |
|
5. Drilling Holes | Top of Page |
|
(1) The distances between the bolt holes on the wooden pieces are
equal to those of the A side of the cardboard ABB triangles (see diagram below).
Because the wood cuts tend to shorten the overall length of the wooden pieces
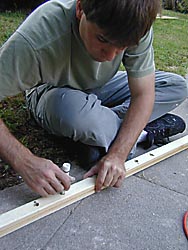
it is generally necessary to slightly fudge the actual measurements.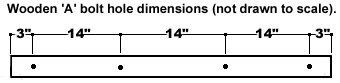 (2) Make a template for the bolt holes by cutting a piece of cardboard 48 inches long and as wide as the so-called 2 inch side of the 1" x 2". (3) Mark the bolt holes on the template by using the measurements from the diagram above. Punch through the markings using a pointed tool such as an awl. (4) Place the template on the 2" side of a wood piece. Make sure that the template covers what will become the outside of the wooden triangle. (All angles are on the inside). (5) If the length of the template is longer than the wood piece adjust the template so that an equal amount of it is protruding over either end of the wood. (6) Holding the template in place mark the bolt holes on the wood piece. |
 |
|
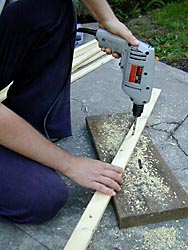
| (7) Drill the holes using a 9/32" drill bit. Try to be as accurate as possible and to drill as straight as possible. |
 |
|
6. Triangle Assembly | Top of Page |
|
|
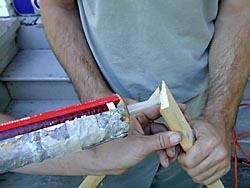
(1) Assembling the wooden triangles requires two people. (2) Select two pieces of cut and drilled wood and smear some wood glue on both faces, then stick them together. Make sure the angles are the mirror images of each other. |
 |
|
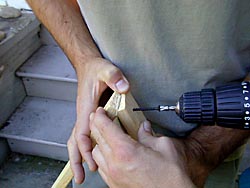
| (3) While one person holds the two pieces steadily together the other drills a hole through both pieces with a drill bit slightly smaller than the width of a drywall screw. Try to drill slightly off center. Pre-drilling will prevent the wood from splitting. |
 |
|
|
(4) Screw the two pieces together through the hole using a 1 5/8"
drywall screw. If the point of the screw sticks out after screwing it in,
remove it and redrill in a different location. (5) Repeat the process on the other side of the angle so the corner is held together with two drywall screws and a glob of glue. (6) Grab a third piece of wood and repeat the process until all three angles of the triangle are securely held in place with glue and two screws. |
 |
|
7. Adding Cardboard | Top of Page |
|
|
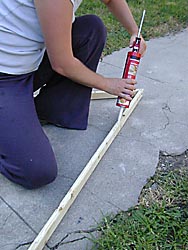
(1) Cardboard is attached to five of the AAA triangles. (2) Select five (or six if you want a spare) AAA cardboard triangles and five AAA wooden frames. (3) Lay the wooden triangle on a level surface with the uncut outer corners pointing upward. (4) Lay a bead of wood glue along the entire upper surface and lay a piece of AAA cardboard atop it. |
 |
|
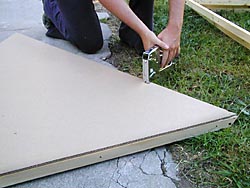
| (5) Staple the cardboard into place using 14mm staples. A good rule of thumb is to staple the corners first to stop the cardboard from moving around then add a staple every 6 inches or so along the length of each side. |
 |